Mayo no events posted in last week
 Trump hosts former head of Syrian Al-Qae... Tue Nov 11, 2025 22:01 | imc Trump hosts former head of Syrian Al-Qae... Tue Nov 11, 2025 22:01 | imc
Rip The Chicken Tree - 1800s - 2025 Tue Nov 04, 2025 03:40 | Mark
Study of 1.7 Million Children: Heart Dam... Sat Nov 01, 2025 00:44 | imc
The Golden Haro Fri Oct 31, 2025 12:39 | Paul Ryan
Top Scientists Confirm Covid Shots Cause... Sun Oct 05, 2025 21:31 | imc Anti-Empire >>
Indymedia Ireland is a volunteer-run non-commercial open publishing website for local and international news, opinion & analysis, press releases and events. Its main objective is to enable the public to participate in reporting and analysis of the news and other important events and aspects of our daily lives and thereby give a voice to people.
Trump hosts former head of Syrian Al-Qaeda Al-Jolani to the White House Tue Nov 11, 2025 22:01 | imc
Was that not what the War on Terror was about ?
Today things finally came full circle. It was Al-Qaeda that supposedly caused 9/11 and lead to the War on Terror but really War of Terror by the USA and lead directly to the deaths of millions through numerous wars in the Middle East.
And yet today the former head of Syrian Al-Qaeda, Al-Jolani was hosted in the White House by Trump. A surreal moment indeed.
In reality of course 9/11 was orchestrated by inside forces that wanted to launch the War of Terror and Al-Qaeda has been a wholly backed American tool ever since then.
Rip The Chicken Tree - 1800s - 2025 Tue Nov 04, 2025 03:40 | Mark
That tree we got retained in 2007, is no more
2007
http://www.indymedia.ie/art...
2025
https://eplan.limerick.ie/i...
Study of 1.7 Million Children: Heart Damage Only Found in Covid-Vaxxed Kids Sat Nov 01, 2025 00:44 | imc
A major study involving 1.7 million children has found that heart damage only appeared in children who had received Covid mRNA vaccines.
Not a single unvaccinated child in the group suffered from heart-related problems.
In addition, the researchers note zero children from the entire group, vaccinated or unvaccinated, died from COVID-19.
Furthermore, the study found that Covid shots offered the children very little protection from the virus, with many becoming infected after just 14 to 15 weeks of receiving an injection.
The Golden Haro Fri Oct 31, 2025 12:39 | Paul Ryan
Disability Fine Lauder and Passive Income with Financial Gain as A Motive
Why not make money?
Top Scientists Confirm Covid Shots Cause Heart Attacks in Children Sun Oct 05, 2025 21:31 | imc
A comprehensive study by leading pediatric scientists has confirmed that the devastating surge in heart failure among children is caused by Covid mRNA shots.
The peer-reviewed study, published in the prestigious journal Med, was conducted by scientists at the University of Hong Kong.
The team, led by Dr. Hing Wai Tsang, Department of Pediatrics and Adolescent Medicine, Li Ka Shing Faculty of Medicine, School of Clinical Medicine, the University of Hong Kong, uncovered evidence to confirm that Natural Killer (NK) cell activation by Covid mRNA injections causes the pathogenesis of acute myocarditis.
Myocarditis is an inflammation of the heart muscle that restricts the body?s ability to pump blood. The Saker >>
Interested in maladministration. Estd. 2005
RTEs Sarah McInerney ? Fianna Fail?supporter? Anthony
Joe Duffy is dishonest and untrustworthy Anthony
Robert Watt complaint: Time for decision by SIPO Anthony
RTE in breach of its own editorial principles Anthony
Waiting for SIPO Anthony Public Inquiry >>
Voltaire, international edition
Will intergovernmental institutions withstand the end of the "American Empire"?,... Sat Apr 05, 2025 07:15 | en
Voltaire, International Newsletter N?127 Sat Apr 05, 2025 06:38 | en
Disintegration of Western democracy begins in France Sat Apr 05, 2025 06:00 | en
Voltaire, International Newsletter N?126 Fri Mar 28, 2025 11:39 | en
The International Conference on Combating Anti-Semitism by Amichai Chikli and Na... Fri Mar 28, 2025 11:31 | en Voltaire Network >>
|
Community Power at the Rossport Solidarity Camp
 mayo |
education |
feature mayo |
education |
feature
 Monday February 08, 2010 18:03 Monday February 08, 2010 18:03 by Shelver - Rossport Solidarity Camp by Shelver - Rossport Solidarity Camp

DIY wind power course review

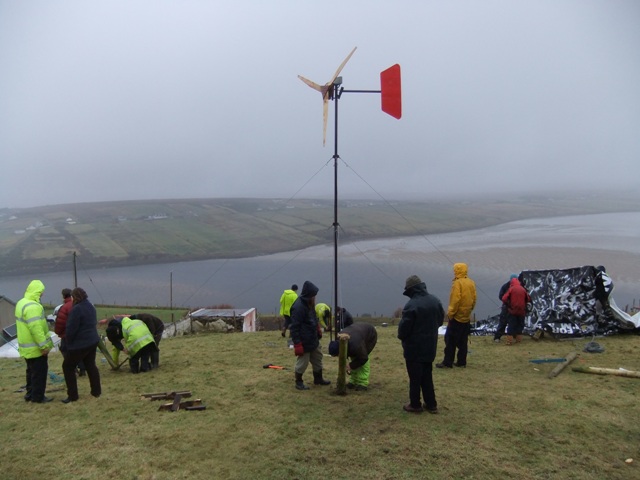
Participants view the finished wind turbine in action
From Wednesday the 27th to Sunday the 31st of January, the Rossport Solidarity Camp hosted a wind power workshop. Local people and campers united to learn metal work, wood work and electronics to produce a fully functional 2.4 meter diameter wind turbine, now supplying power to the off-grid Rossport Solidarity House. The use of farmer's shed for the week was kindly by donated which was the perfect base for the workshop. The course was led by V3 Power, a workers co-operative based in Nottingham specialising in teaching courses in how to build DIY wind turbines.
Related Links:
Shell to sea website |
Hugh Pigotts website |
More about Hugh's work (video) |
Gluaiseacht website |
more about V3
At the start of the course the group participants split into 3 groups, so that each group would alternate between the 3 work areas of woodwork, metalwork and electronics over the first 3 days. Over the last two days participants concentrated on areas they were particularly interested in, or just did what was needed to finish the project.
The course was very hands on, albeit sprinkled with helpful wind power theory presentations.
In the wood work area, the blades were carved from lengths of 2x6 white deal, as straight grained as possible. The design as for the rest of the windmill came from Hugh Pigott, a DIY wind power pioneer based in Scotland. Saw, hammer & chisel followed by drawknifes honed the blades down an aerodynamic shape. They were linseed oiled, sandwiched in plywood discs at the centre and screwed together.
In the metalwork area steel was cut and welded for the mounting, tower and tail vane. Many people learned to weld for the first time, with the local blacksmith and mechanics on the course to pass on their expertise.
In the electronics area participants soldered the control board, wound the copper coils, built the rotors, and set the coils in fibreglass to make the stator.
Up at the house, the site was surveyed for a suitable spot. Measurements on the ground followed by some trigonometry found the correct lengths of steel wire needed to support the turbine.
After a dry run in assembling and erecting the turbine, everything was taken apart and weather proofed by painting.
After lots of effort from the participants and V3, the turbine was set up on Sunday in a typical Mayo weather mix of sun, sleet and hailstone. There was great interest locally news having spread only by word of mouth.
For the camp house the new turbine gives us a greater electricity supply, and has consistently kept our battery bank well over 12volts since hooked up. It also means we can take our old small wind turbine to the camp when we set up again in the summer.
Most of all, the course brought people together and brought practical new skills to many of us. We now have more confidence in reclaiming control over our energy supply and how it is generated.
Big thanks to all involved: environmental NGO Gluaiseacht for funding, the participants for coming together to help power the Camp, V3 power for coming all the ways over, a good teaching ethic and for the finished product, local people for donating materials, Betty for showers, the Camp for catering & organising and Pat for the venue, help and resources at every stage of the course.
You can find out more about V3 HERE
Or you can look up more about the Hugh Pigotts design at his WEBSITE or see a video about his work HERE
More photos to follow!
|


 printable version

 Digg this
 del.icio.us
 Furl
Furl Reddit
 Technorati
 Facebook
 Gab
Gab Twitter
View Comments Titles Only
save preference
Comments (8 of 8)
Jump To Comment: 1 2 3 4 5 6 7 8Overall it was a class few days. Thanks again to V3 and also for the use of the shed for the workshop. I especially like the fact that alot of people from the area called in just to have a look and seem very interested. Also that a few people who were on the course are already talking about making their own turbine, is great.
V3's website is actually here: http://v3power.co.uk
or the blurb on the course we did is here: http://v3power.co.uk/Jan10.php
Carving the 3 wooden blades
Terence checks the front face of the blade
Draw knifes were used for most of the later work
Like the A-team, only with multi-coloured hats
Bearing hub was from an old Opel Vectra
Well, we know what youre against, but what are you for?
http://livinginrossport.wordpress.com/2010/01/26/well-w...-for/
Winding the coils
Making the Control board used to protect the batteries
Soldering the 9 coils that make up the stator
The 2 plates of 12 magnets are set in resin to make the rotors
The coils are also set in resin
.
This circuit dumps excess power when batteries are full and also provides a wind turbine brake
Getting the turbine site ready
Main mounting - Stator in red & 1 plate of magnets on top
Watching it go
.
A community built wind turbine
Looks like I missed a really 'powerful' learning opportunity up in Erris - may those blades keep spinning and powering the resistance to $hll for many years to come!
Exactly what people in this country need to start thinking about learn to do it yourself, and stop being screwed by multinationals and corrupt governments
Trific job, all! See yez soon.
Great job! But did ye not need planning permission for it? Would hate to see it pulled down! :O